Last updated on October 17th, 2024
Drawing your pistol from the holster can seem like an easy thing to do, and indeed it is easy for most people. However, presenting your pistol from the holster can also be unsafe if done improperly. We need to crawl before we can walk, and walk before we can run. For that reason, we have broken down drawing a pistol from the holster into 5 very easy steps.
Step by Step, the process of drawing a Pistol from a Holster, for beginners.
Access the Pistol
In the first step, you need to access the pistol. If you are drawing from concealment, that means clearing the cover garment. It is important in this step to get an excellent one-handed grip because the grip you have now is the grip you’re going to keep. 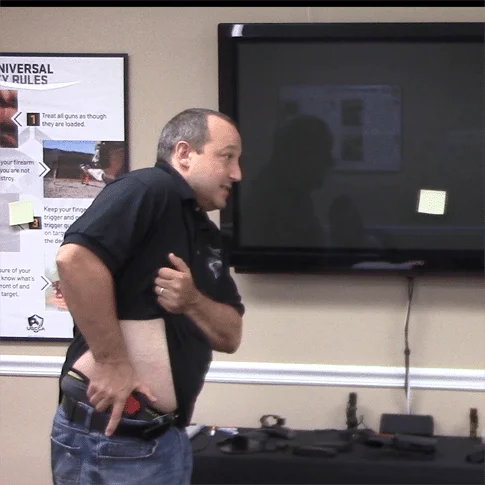
Release the Pistol
Simply pulling up on the pistol releases it from the holster. This is unless you have some sort of active retention. While most inside the waistband holsters use friction for retention, many outside the waistband holsters may have a lever or button to defeat to release the pistol. Your support hand is still pressed against your body when releasing the pistol from the holster.
Rotate your Elbow
At this point, you are orientating the muzzle of your pistol towards the threat. Simply drop your elbow to point your elbow at the ground and the muzzle at the threat. You could fire now from this position if the situation required it.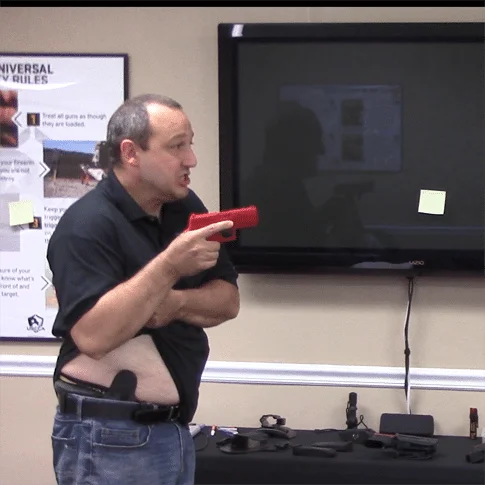
Join your Hands
Assuming your support hand is still pressed against your body, now is the time to join your hands and assume a good two-handed thumbs-forward grip. While at the beginning of our holster-draw training we join our hands together before we extend, the reality is as we get more fluid, through repetition and practice, the join and extend blur into one motion. Having said that, it is important that the joining of our hands into a good grip occurs early on in our extension while our hands are close to our body. Again, you could fire from this position if you had to.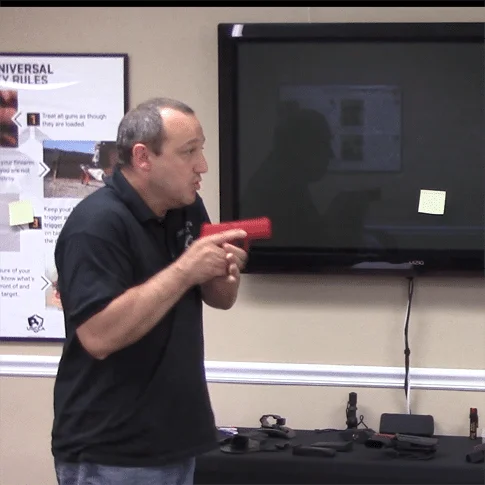
Extend and Press
The extend and press step is one step, rather than two. You could press the trigger at any time during the extension of your firearm. Once your muzzle is orientated towards the target, press the trigger. One thing to keep in mind, do not fall into the bad habit of bowling or fishing. This means either sweeping up or casting down with the firearm as you extend. Instead, think about punching like a boxer straight out from the high-compressed ready position. 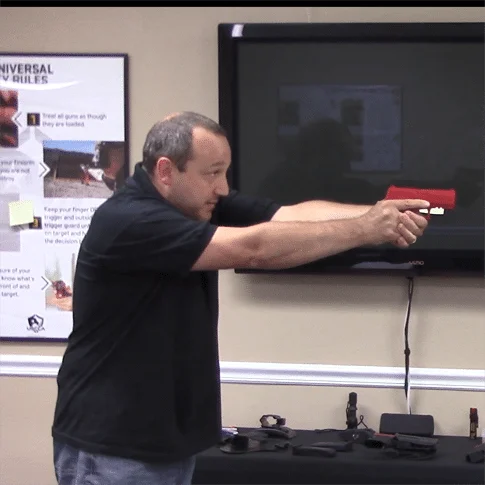
Safety Concerns when Drawing a Pistol
Safety is always a concern, especially when we are working with pistols. Remember a firearm is neither safe nor unsafe by its’ self. It is the user who is safe or unsafe. With that in mind, we must be aware that people can and have shot themselves while either drawing the firearm from the holster. There are a few steps we can take to prevent these negligent discharges from occurring.
- Keep your finger straight and away from the trigger while drawing the handgun and until your muzzle is orientated towards the target and you’ve made the decision that now is the time to shoot. Many people have discharged into their leg by not exercising proper trigger discipline when drawing the firearm.
- Scan your environment before you put your handgun away. Make sure it is safe to put the pistol into the holster and there are no other bad guys that need your attention.
- Once you’ve decided it is safe to put your pistol back into the holster, move deliberately. Clear your garments, look at your holster, visually ensure your garments are clear and then place the firearm back into the holster carefully. This process only takes about a second. Looking at the holster is one of those great “Controversies” that gun owners love to argue about and we discuss in greater detail in the article “Should I Look at my Holster When Reholstering”.
Learning Advanced Handgun Draw Techniques
In our Defensive Pistol Classes, we build upon these basic steps. We begin to add techniques such as shooting from retention, moving while you draw, shooting on the move, and drawing the pistol from the holster in unorthodox positions. It’s the goal in the Defensive Pistol classes to allow the student the opportunity to experience these shooting techniques so they’re not trying to figure it out for themselves in a life and death moment.
Shooting from retention means the student is placing defensively accurate hits on target from the high compressed ready position using either one or two hands. When shooting in a defensive context, statistics show often this is done at around 9′, sometimes even closer. For this reason, full extension of the handgun isn’t always possible.
Moving while you draw the pistol, sometimes referred to stepping off the X or stepping off the line of attack, may be enough to momentarily confuse an attacker enough to give you the fraction of a second necessary to survive. As a bonus, many shooters including myself, have stated it’s actually more comfortable to draw the pistol while moving rather than standing still. While there is no one size fits all solutions or techniques to firearm training, we allow the student to experience stepping off the line of attack and deciding for themselves which method they prefer when drawing the pistol.
Let’s face it, the real world is different from the shooting range where the targets are only in one direction and predictable. Perhaps in the chaos that is a life and death moment we’ve tripped or been pushed to the ground. In my more advanced Defensive Pistol classes, we instruct the student how to shoot from unorthodox positions such as lying or seated. There are subtle nuances to these holster draw techniques a shooter needs to know so as not to create an unsafe condition for themselves or those innocents in their vicinity.
Holster Draw Dry Fire
You should practice to draw a pistol From a holster. The techniques described in this article and the above-linked video can be practiced dry fire in your home. It is important to get as much repetition as possible to build muscle memory into your neuropathways. Ensure that your pistol is unloaded and there is no ammunition anywhere in the room, or use a dummy gun similar to the ASP red pistol shown in the video and images on this article. Keep the firearm pointed in a generally safe direction and go smoothly by the numbers. Speed will come with repetition. Focus on proper technique so you aren’t introducing training scars when drawing the pistol from the holster.
Get notified about classes, changes to the law, and more! Sign up today.